
Step-by-step: How to Create a Google Business Profile
Google Business Profile (formerly known as Google My Business) is one of the most effective tools for marketers to use when working with local businesses. Without GBP, businesses are unable to feature in the Local Pack or Local Finder, which should be a key goal for businesses of this nature. Creating a Google Business Profile for your business is an essential first step toward SEO success. Setting this up correctly is critical, so this comprehensive guide will show you the best way to set up a Google Business Profile.
If you don't have one yet! You can easily do this yourself as instructed below or pay us to do it for you.
1. Create a Google Account Specifically for Your Business
Before you can create a Google local listing, you’ll need to create a Google Account. Google Accounts are available to everybody and are simple to use. You can either use an existing email to set up your Google Account or make a new one. Visit accounts.google.com and select ‘Create an account’ to get started.

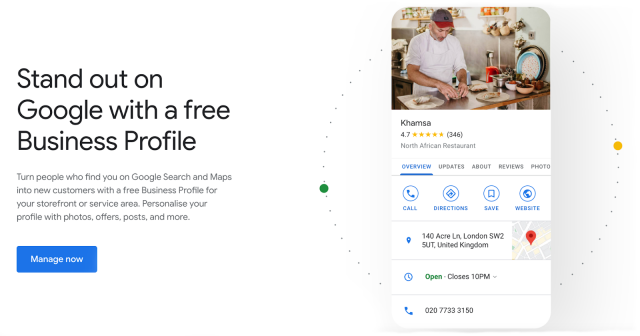
2. Visit the Google Business Profile Gateway
Once you have your new email address, head to google.com/business and click ‘Manage now’ to get started:
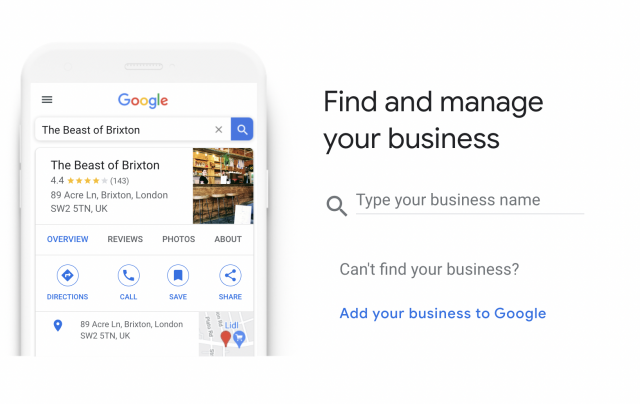
3. Look for the Business
Begin by typing in the business name to see if a profile with this name already exists. If it does, then you’ll see it appear as you’re typing. If the business name doesn’t appear, then go ahead and click ‘Add your business to Google’.
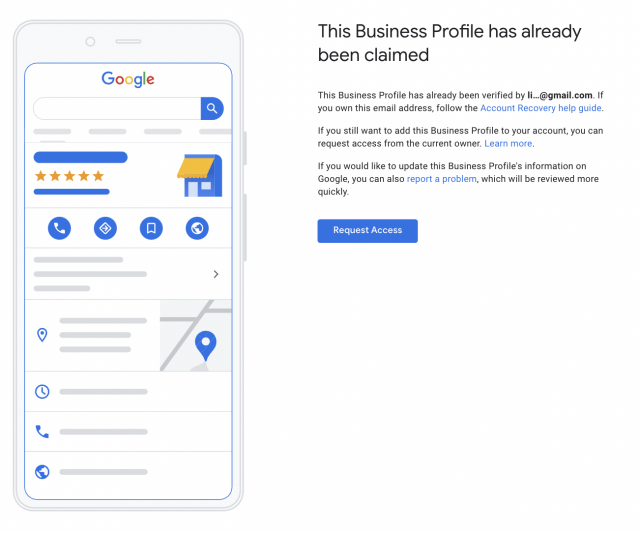
Requesting Access to an Existing Business Profile
If someone has already created a Google Business Profile for the business, then don’t worry. You can request that management of the profile be handed over to you. Simply click ‘Request Access’ and you’ll be guided through the process.
4. Add the Business Name and Category
If you’re creating a new profile, then the next step is to add the business name and category. The name that you use here should exactly match the official business name. Don’t be tempted to add any keywords to the name, as this violates Google’s guidelines.Next, choose the category that most closely matches the business. You’ll have the option to edit this within the profile later, as well as to add additional categories, so don’t worry if you’re not completely sure what to select right now. For guidance, check out our advice for local businesses on how to choose the best GBP categories.

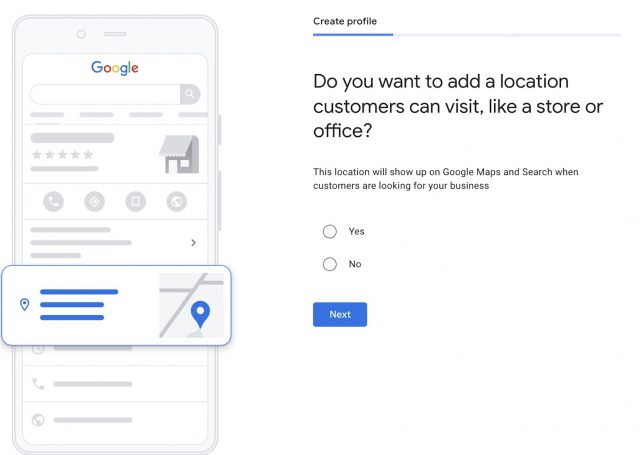
5. Does the business have a physical location?
If the business has a physical location that customers can visit for face-to-face interactions, then you’ll now need to share this information. If this is the case, then select ‘Yes’ and click ‘Next’. If the business only operates online or has a physical location but doesn’t receive customers in person, then select ‘No’ instead.
Warning: Don’t be tempted to inappropriately say the business has a physical location in an attempt to manipulate local rankings. The listing may get suspended or removed entirely in the future for violating the guidelines in this way.
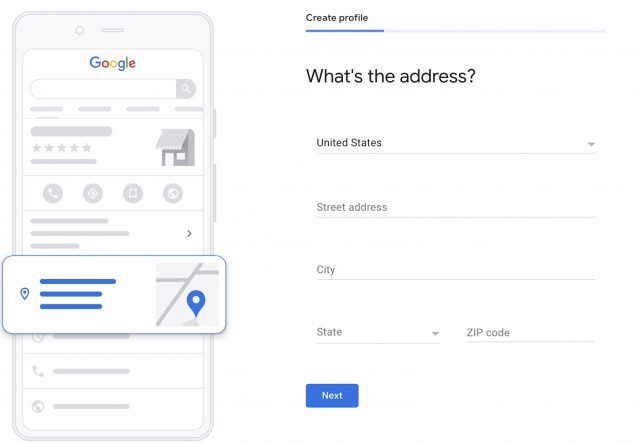
6. Enter the Business Location
If the business has a physical location, then you can now provide the address. You might be asked to position a pin on a map to confirm the location.
It’s important that the address you give is accurate and complete to prevent any confusion to customers or issues with the verification process.
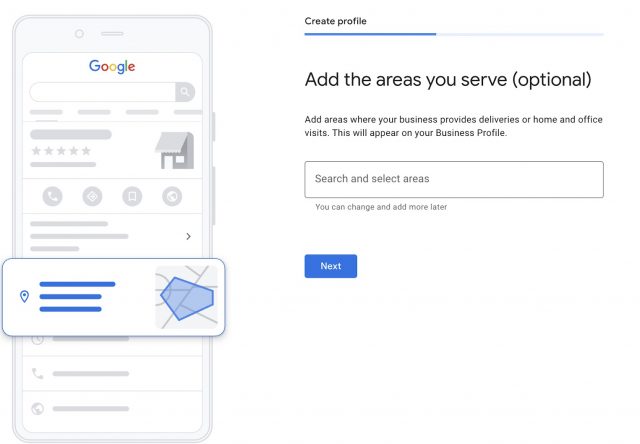
7. Does the business provide home deliveries or services?
If this is a service-area business, or if the business delivers items to customers at home, then select ‘Yes’ on the next step.
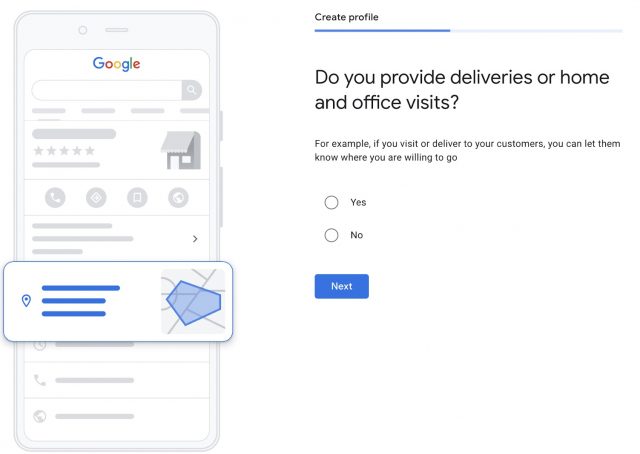
If you select ‘Yes’ then you’ll need to enter the areas that the business serves or delivers to. You’ll be able to come back and edit this information later, and you’ll be able to add new locations any time the business expands.
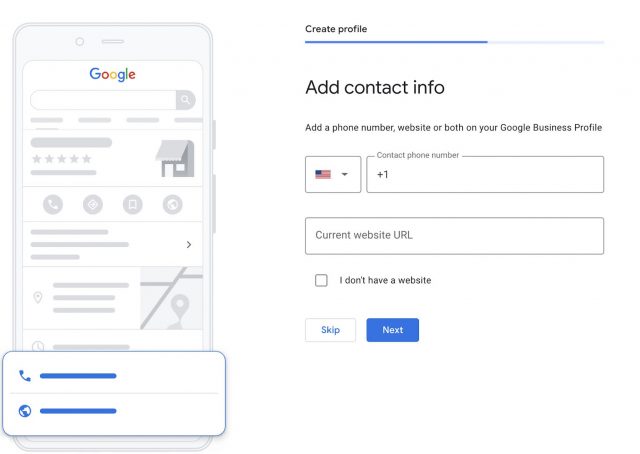
8. Add Contact Details
The next step is to add the contact details for the business. You’ll need to enter the phone number, and you also have the option to add the business website. If the business doesn’t have a website, then tick the box on this page.If a website is later created, you’ll be able to add this information then.
As an agency setting up GBP for a client, you’ll need to enter the client’s contact details, not your own. It’s a good idea to communicate clearly to your client that they’ll be contacted by Google for the verification process, which we’ll explore shortly.
9. Stay in the Know
Before you move on to verifying the business, you’ll be asked if you’d like to receive helpful tips and recommendations from Google. Although there’s no obligation, you might find it beneficial to receive this information.
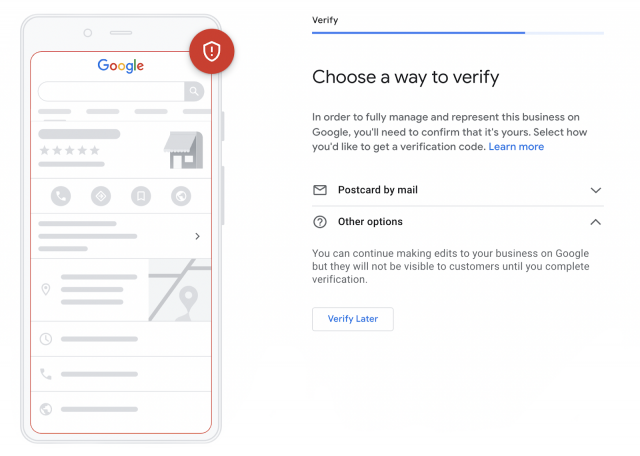
10. Verify the Business
In this step, you must choose a verification method to prove the business is operating at the specified address. Receiving a postcard by mail to the business address is the most common route for verification, but you might also have the option to do so via phone or email.
Note: You can continue to make edits and updates to GBP while verification is pending, but the profile won’t be visible on Google during this time.
Postcard Verification
This type of verification is available to all businesses. A postcard will be sent to the business address and will usually arrive within five days. The postcard will contain a code to enter the appropriate place within the GBP account. If you don’t receive the postcard, then you can request a replacement.
Phone Verification
Some businesses will be able to verify their accounts over the phone, but this option isn’t available to everyone. You’ll see this option on the verification page if you're eligible.If you decide to use this method, then you’ll receive a code via an automated phone call.
Email Verification
As with phone verification, the email alternative isn’t available to everyone. If you do have the option to verify by email, then you can request a code to your inbox. This will only be possible to the email address connected to the GBP account.
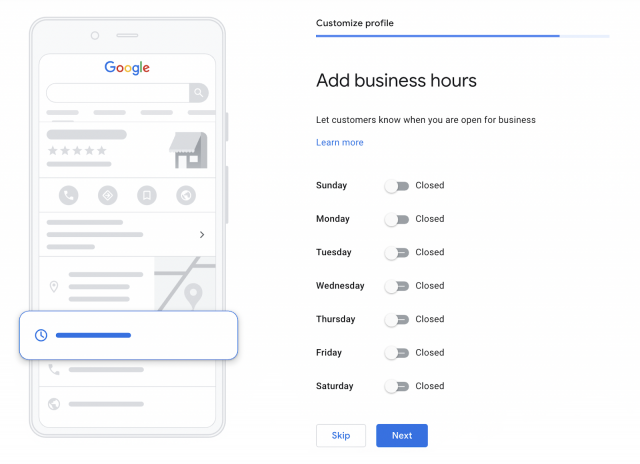
11. Add Your Business Hours
There are several reasons why your hours of operation may temporarily change, such as public holidays or staff illness. In these cases, it’s a good idea to let your customers know. For more information on why this is important and how to do it with ease, check out our guide to managing opening hours in Google Business Profile.
There are several reasons why your hours of operation may temporarily change, such as public holidays or staff illness. In these cases, it’s a good idea to let your customers know. For more information on why this is important and how to do it with ease, check out our guide to managing opening hours in Google Business Profile.
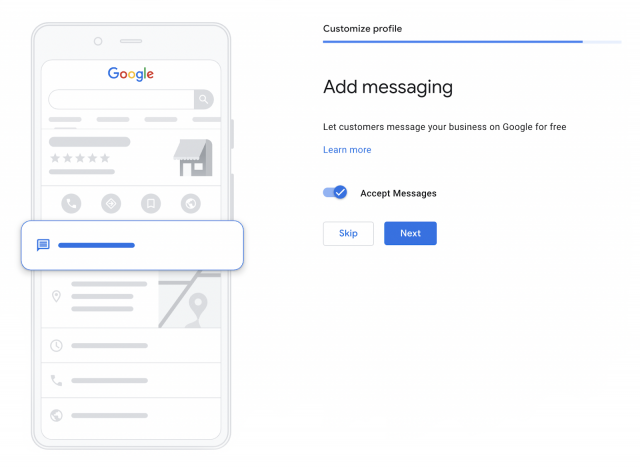
12. Add Messaging
Accepting messages from potential customers within GBP is a great way to connect with your audience and drive sales. However, you should only enable this function if you can commit to managing it consistently. Being unresponsive to messages will create a poor user experience and could harm your business reputation.
If you do wish to accept messages, then simply click the button. You can come back and pause or disable this feature at any point.
13. Add the Business Description
Describing the business will help consumers know what it’s all about and whether it’s a good fit for their needs. You can write up to 750 characters within this section, so be sure to use this opportunity to put the most important information across clearly and concisely.
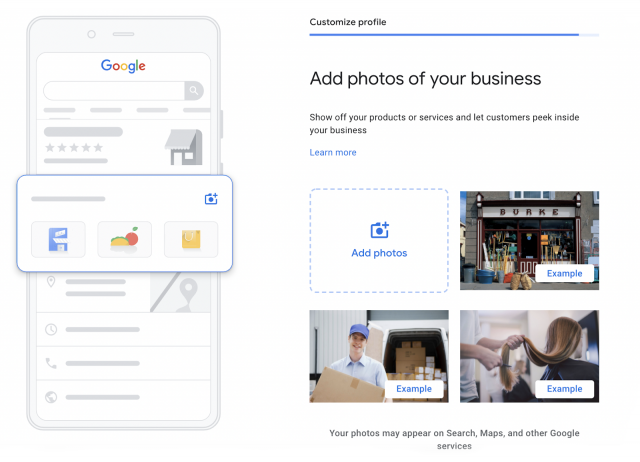
14. Add Photos
Adding photos is a fantastic way to help searchers visualize the business and get a glimpse of the brand. Customers can add their own photos to the listing; some people will choose to do this when leaving you a Google review.
Be aware that you won’t have any control over the order in which photos appear on your listing, so it’s a good idea to mix several of your own images with the user-generated content.
Make sure you showcase different aspects of your products and services, as well as different areas of your physical location
.Our ultimate guide to looking good online with GBP photos will teach you all you need to know!
15. Add Social Media Profile Links
While Google does tend to pull these from other parts of the web, including your business website, most users will have the option to expand on or overwrite these via a few simple steps:
- Go to your Business Profile.
- Click ‘Edit profile’ and then ‘Business information’ and then ‘Contact’.
- To edit, click ‘Social profiles’ and then the down arrow.
- In the drop-down menu that opens, select the social media link you would like to add.
- In the web address field, add the link then click save.
Optimize Your Google Business Profile
Once your listing is good to go, then it’s time to consider how best to optimize GBP to maximize visibility and conversions.
Once your listing is good to go, then it’s time to consider how best to optimize GBP to maximize visibility and conversions.
Some essential ongoing tasks include:
- Adding new photos and videos
- Using Google Business Profile Q&A to connect with your audience and answer their questions
- Creating Google Business Profile Posts to showcase offers and promotions
- Listing your services, products, or menu items
- Requesting Google reviews

How to Verify a Google Business Profile
For the most part, Google keeps product and service registrations as straightforward as possible.
You can set up a Gmail account in seconds. Ditto for Google Ads. And on the face of it, setting up Google Business Profile (formerly known as Google My Business) follows the same principle. That is until you’ve registered but aren’t able to make changes to your GBP straight away.
So, what gives? Well, verification. It’s a pain, we get it. But until you prove who (and where) you are, you won’t be able to do any of these things:
How do I get my business verified on Google?
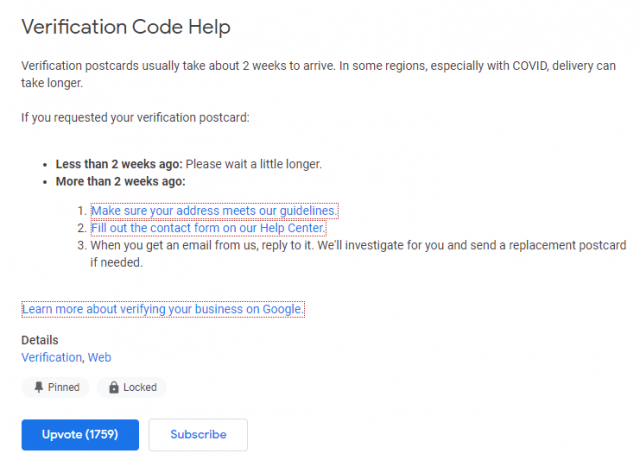
Google says that most local businesses will need to verify their listing by post. This means they will send you a postcard containing a verification code that you will then need to enter to confirm your listing.
How long does it take for Google Business Profile verification?
The time required for Google Business Profile verification depends on the method of verification. In some cases, Google will allow instant verification. This may happen if your business is already verified in Google Search Console. Other methods of verification vary—the postcard for example takes around a week to arrive on average but it can be longer if the postal service is busy. Google will then need around one week to manually verify. If verifying by email, the email should arrive right away but you’ll also need to allow up to a week for manual verification to then take place. For video verification, once your video is uploaded it should take around five days for the video to be reviewed by Google. If you’re given the option to verify via live video call, you’ll need to check the support hours for your region and then join the line to speak to an advisor, all of which can be frustrating when you’re ready to take control of your local SEO and optimize your Google Business Profile.
- Edit your business information across Google (e.g. Search and Maps), including business hours
- See your GBP insights
- Upload images
- Respond to online reviews about your business
How do I get my business verified on Google?
Google says that most local businesses will need to verify their listing by post. This means they will send you a postcard containing a verification code that you will then need to enter to confirm your listing.
How long does it take for Google Business Profile verification?
The time required for Google Business Profile verification depends on the method of verification. In some cases, Google will allow instant verification. This may happen if your business is already verified in Google Search Console. Other methods of verification vary—the postcard for example takes around a week to arrive on average but it can be longer if the postal service is busy. Google will then need around one week to manually verify. If verifying by email, the email should arrive right away but you’ll also need to allow up to a week for manual verification to then take place. For video verification, once your video is uploaded it should take around five days for the video to be reviewed by Google. If you’re given the option to verify via live video call, you’ll need to check the support hours for your region and then join the line to speak to an advisor, all of which can be frustrating when you’re ready to take control of your local SEO and optimize your Google Business Profile.
You may also find that this process can be more complicated when you are verifying multi-location business listings. Fortunately, additional features, functions, and support are available.
What if I’m tempted to skip Google Business Profile verification?
If you skip verification, there’s very little point in claiming your Google Business Profile in the first place, as you won’t be able to access most of its features without completing the verification process.
Do I have to verify by postcard?
Postcard verification has historically been the most popular method of verification – it’s also the slowest, which is why many local businesses would prefer another option. Thankfully, Google has added new methods of verification in the form of video uploads and live video calls, which are much quicker. In some instances, Google will offer other alternatives to postcard verification.
If you’re a service-area business operating within a specific geographic area or a hybrid business that both serves customers at your place and visits them at theirs, you may be given the option to complete verification via email, phone, or through Google Search Console.
There is also a bulk verification option for businesses with multiple locations (such as a chain of stores or restaurants). If you’re eligible for this option, you’ll be asked to complete a form, including a telephone number for verification and a business manager email, to confirm you are an authorized representative. You must verify by post if you aren’t given an email, phone, or Search Console verification option. The only way to determine your options is to claim your listing and proceed to the verification stage.
How do I verify Google Business Profile?
When you have claimed your listing, Google will present you with appropriate verification methods, which may include via email, postcard, or video.
How do I verify Google Business Profile?
When you have claimed your listing, Google will present you with appropriate verification methods, which may include via email, postcard, or video.

Not Seeing Multiple Options?You may find that you don’t have an option, however, and are forced to use either video, postcard, or another method. There currently doesn’t seem to be any rhyme or reason to which types of businesses are forced to verify in which ways, however.
Verify With a Postcard:
Verify Over the Phone:
If your business is eligible for phone verification, you’ll see a phone option when you click ‘Verify’.
Verify Via Email:
Some businesses may be given the option to verify by email, rather than a postcard.
Verify With a Video Recording:
Verify With a Video Call:
Is my business verified on Google Business Profile?
Verify With a Postcard:
- Log in to Google Business Profile and click ‘Verify’.
- Ensure your address is entered accurately, with full street name and zip code.
- Include your floor, suite, or building number.
- Add a contact name.
- Click ‘Request Postcard’.
- Wait for your postcard to arrive, then log back into Google Business Profile and enter the verification code. This code will expire after 30 days so it’s advisable to verify as soon as possible after you receive the postcard.
Verify Over the Phone:
If your business is eligible for phone verification, you’ll see a phone option when you click ‘Verify’.
- Log in to Google Business Profile and click ‘Verify’.
- Click the associated phone number.
- The code will be sent via an automated phone call or text message.
- Return to Google Business Profile and enter the code you were given.
Verify Via Email:
Some businesses may be given the option to verify by email, rather than a postcard.
- Log in to Google Business Profile and click ‘Verify’.
- If you see the email option, click this.
- Go to your email and follow the instructions provided in the message from Google.
Verify With a Video Recording:
- Log in to Google Business Profile and click ‘Verify’ you must be at your business location).
- Click the video option and start recording.
- Your video will need to include your business location (try to film street signs), the business itself, and proof of management (entrance into staff-only areas, for example, or video yourself unlocking the premises with your keys).
- End the recording and upload your video.
Verify With a Video Call:
- Log in to Google Business Profile and click ‘Verify’ (you must be at your business location).
- Select the video call option.
- Click start call. A text window will open with a support assistant, and they will walk you through how to join the live video call.
Is my business verified on Google Business Profile?
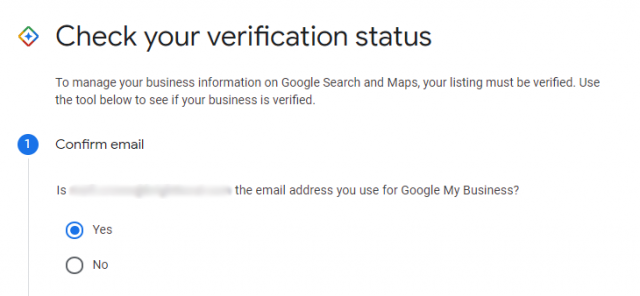
You can check if your business is verified by logging in to your Google Business Profile. If your listing is verified, you’ll see the dashboard and have access to all features. If your listing isn’t verified, the verification options will show. Or, you may be offered no verification options and instead, see a message saying that someone else has verified that profile:

If you see this image, you’ll need to use the ‘request ownership’ option to send an email to the other party asking them to contact you. That person can then confirm or deny your request. If the present owner doesn’t reply, your ownership request email will contain a link that will then walk you through a verification process.
Verifying your Google Business Profile listing can take some time but is necessary to manage and use your Google Business Profile. It’s advisable to start the process as soon as you can as verification can take a while to complete, depending on the verification options presented for your business.
Verifying your Google Business Profile listing can take some time but is necessary to manage and use your Google Business Profile. It’s advisable to start the process as soon as you can as verification can take a while to complete, depending on the verification options presented for your business.